- BGP Lab Exercise (Thursday afternoon)
- Constructing an ISP network using OSPF and BGP
Remove all the old configuration from the routers. You will be completely renumbering the classroom network. All that should remain are the physical Ethernet connection from your router to your PC.
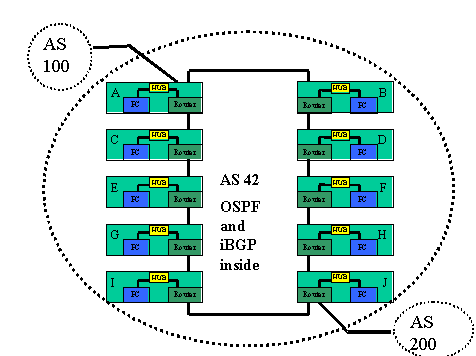
You will need to connect the routers to form the ring in the diagram above. Use the serial cables provided to do so.
You will need address space for this network. Ask the classroom instructor to give you address space.
Address block for the workshop lab:
Now work out the addressing plan for the workshop. You will have to make sure that the address space received is actually sufficient for the network.
Once you have decided on the address assignments for the PC LANs and the point to point links between the routers, you can now proceed to assigning the addresses to your router interfaces. Verify that you have IP connectivity to your directly connected routers.
Once you have verified IP connectivity you can go ahead and set up OSPF. Hint: refer to the earlier lab presentations and notes on how to set up OSPF – and remember that the router-id is established from the IP address of the loopback interface of the router. If you haven’t assigned an IP address for the loopback, you will need to return to Step 4 above.
Decide how you want to set up the OSPF. It might be useful to decide who in the class will be the network manager, in charge of the project of deploying the ISP network, and deciding some of the configuration details. For example, will you use PPP on the point to point links, or will you use HDLC. Or will you use OSPF neighbour authentication or not. And so on.
With OSPF running throughout the network, you are now ready to set up iBGP. Again, refer to the earlier notes on how to set up iBGP.
Recall that OSPF carries only the infrastructure addresses. Hint: You can put the PC LAN network address into iBGP, rather than into OSPF.
For Team A and J only: Router Teams A and J are connecting to AS1 and AS2 respectively. The workshop instructors will have set up two routers to be in AS1 and AS2. Set up the eBGP peering with the two external ASes. Remember that you will need to generate an announcement for your aggregate, and that you will need to apply a sanity inbound filter for the prefixes you hear from your neighbours Hint: refer to the BGP presentation to ensure that the external next hop is carried through the network.
Confirm connectivity. You should be able to see the Internet from your PC. If not, contact the class network manager you appointed earlier. The network manager will liaise with the instructors operating the routers in AS1 and AS2 to work out what the connectivity problems might be.
Ask the instructor to confirm your configuration.
Save the configuration to the tftp server as described earlier in the week.